Website Guide (Chapter Organisers)
This guide covers how to use the admin area of the codebar website if you are a chapter organiser, with a focus on creating a workshop.
Intro
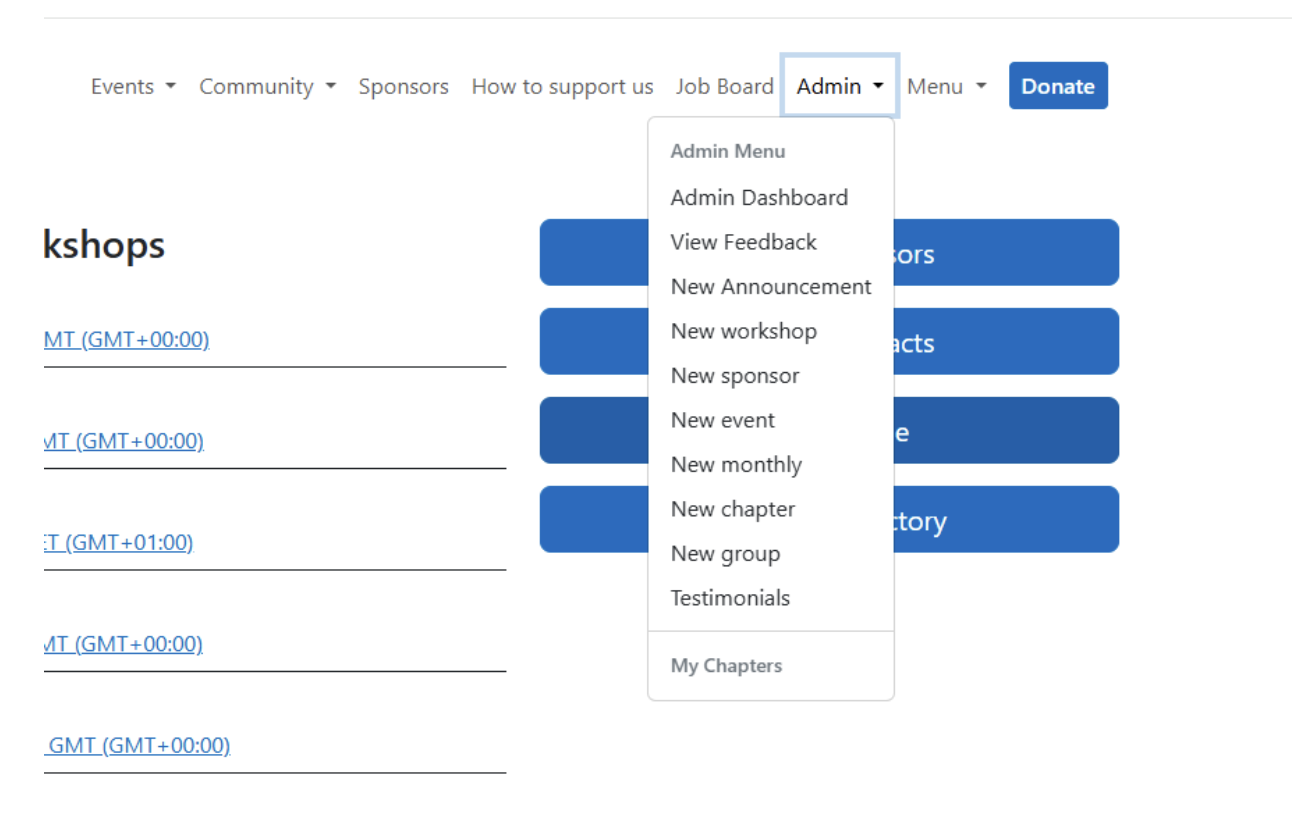
Once you’ve been given admin access on the codebar website you’ll see extra options in the left-hand menu, including the ability to create sponsors, create workshops, view feedback, and access your chapter admin area under My Chapters.
Chapter admin area
In your chapter admin area you can see upcoming workshops, view students/coaches, and see the latest subscribers.
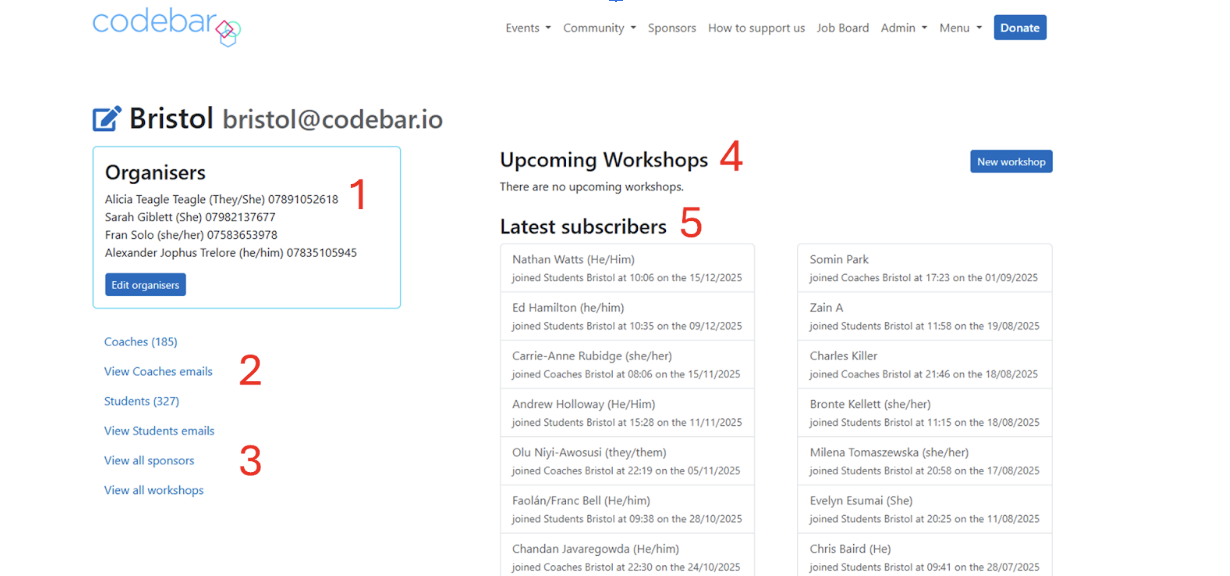
- Organisers list for your chapter
- Coaches and students subscribed to your chapter
- Clicking Students or Coaches shows a full list
- Clicking View students emails / View coaches emails shows email addresses
- View all workshops shows every workshop your chapter has run (and lets you open old workshop admin pages)
- Workshops list shows the workshops you’ve created; click one to open its admin page
- Latest subscribers shows recent signups (name, pronouns, whether student/coach, and time). Clicking a person opens their member admin area.
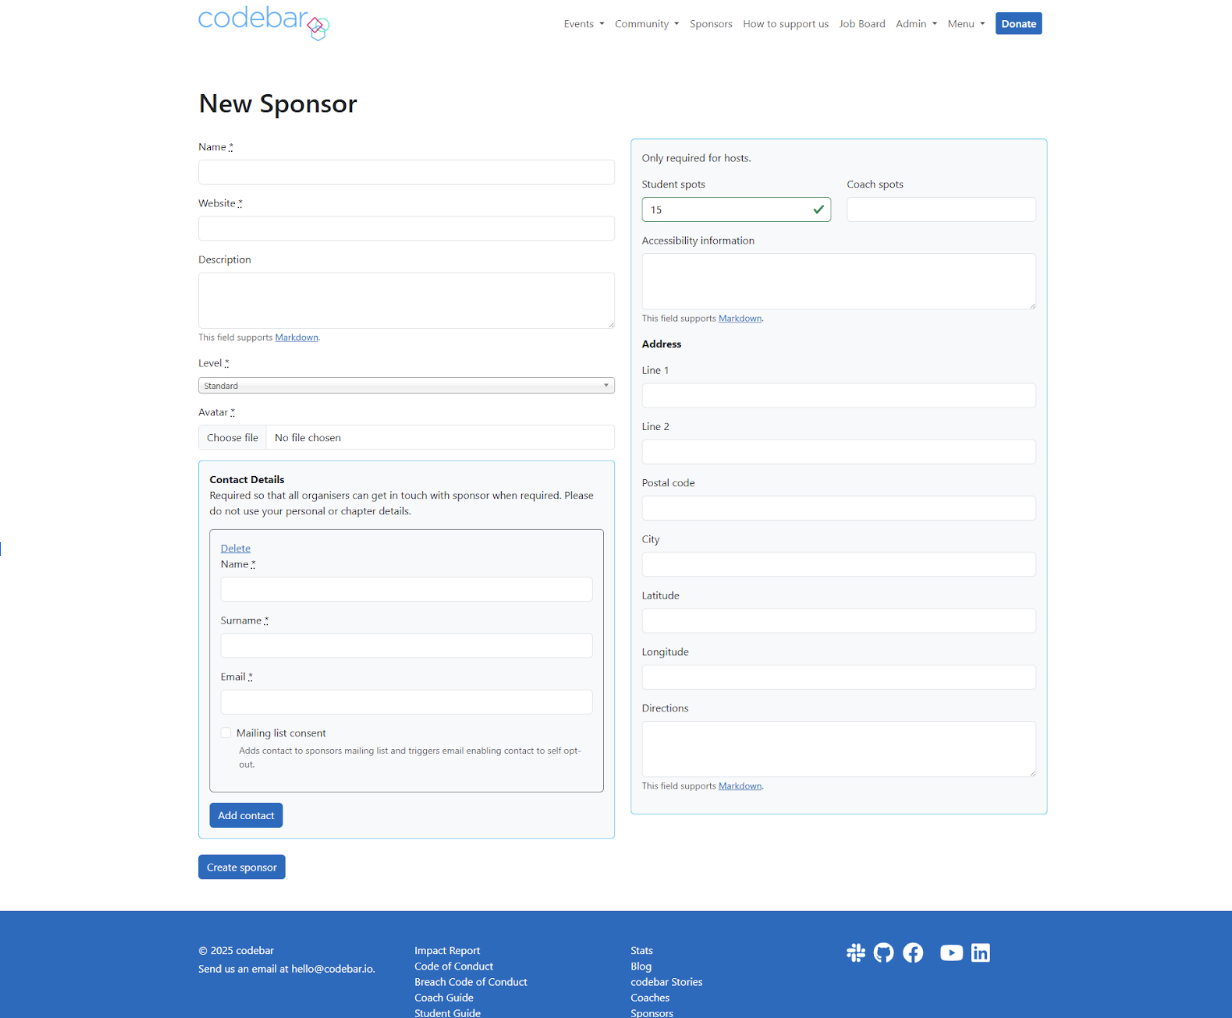
Adding a sponsor
If the company has never hosted a codebar workshop before, you’ll need to add them as a sponsor before creating the workshop. If they’re already in the system, you can skip to creating the workshop.
- Go to the New sponsor tab in the left menu
- Fill out the required fields and click Create sponsor
Notes:
- Website: usually the company website, unless they ask you to link elsewhere
- Avatar: ask for a transparent-background PNG logo
- Address: you don’t need latitude/longitude unless the map pin is wrong;
- Directions are useful if the location is hard to find
- Accessibility: even if optional, do your best to add it (at minimum: step-free access to the workshop and bathrooms)
- Contact details: the dropdown is useful if the person already has an account; otherwise add name/email manually
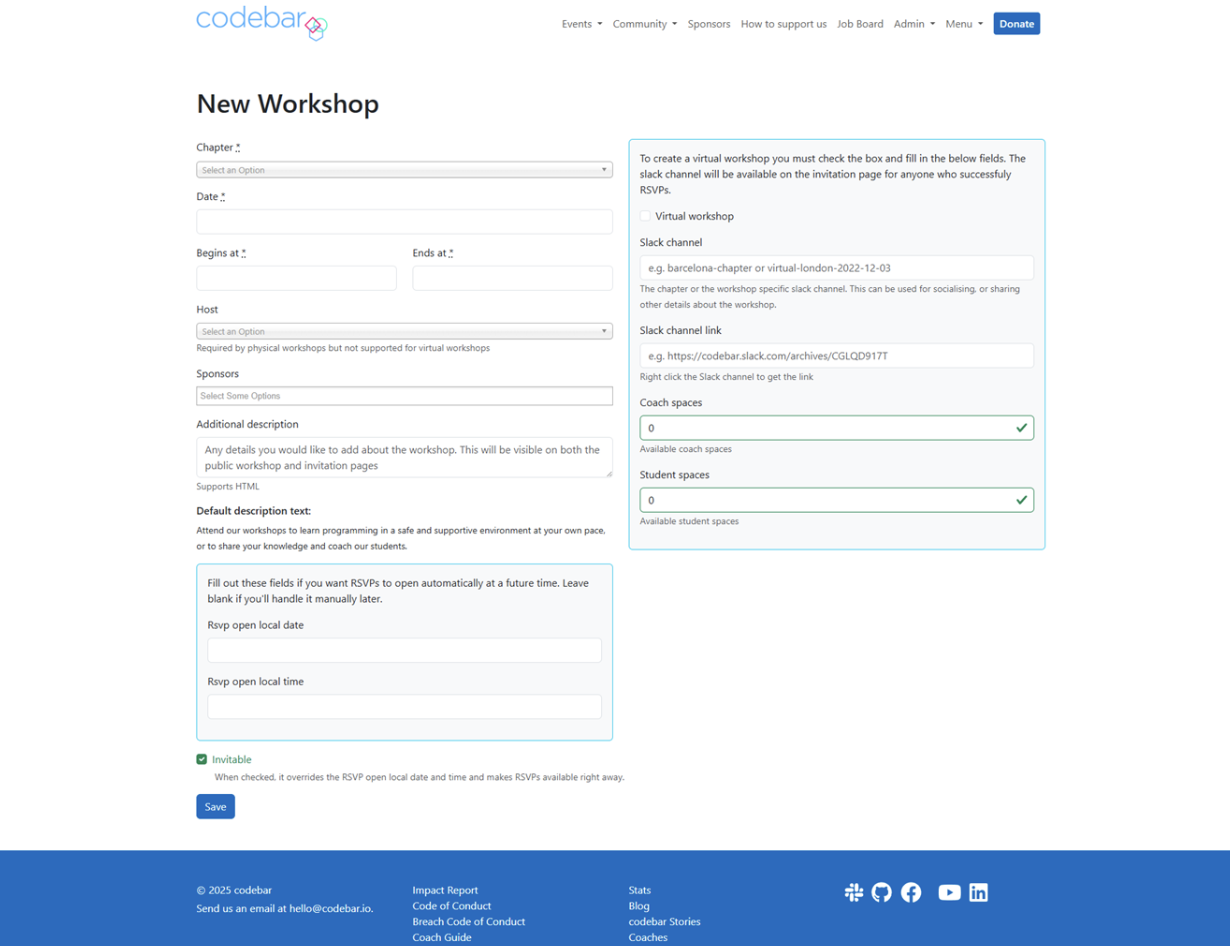
Creating a workshop
If it’s a new sponsor, make sure you’ve created the sponsor first.
If you need to change student/coach numbers for the host, go to https://codebar.io/admin/sponsors, find the sponsor, and edit it.
- Go to the Admin tab and select New Workshop
There are two parts depending on whether the workshop is in-person or virtual. For both, these fields are required:
- Select your chapter
- Select the date
- Select the start time (include the 30 minutes of socialising beforehand)
In person (left side)
- Select the host
- Select your sponsor(s)
(sometimes a different company sponsors food/drink; if it’s the same, select the same company as host) - Optionally set the date/time the workshop should auto open RSVP
- Ensure Invitable is unchecked if you don’t want RSVPs yet (leave it checked if you do)
- Click Save
Virtual (mostly right side)
- Check Virtual workshop
- Create a workshop channel in Slack and enter the channel name
- Get the Slack channel URL (in Slack: click the channel name → Copy Link) and paste it in
- Enter coach and student spaces
Note: we normally do not have a sponsor for virtual workshops, so don’t add one unless there is an explicit agreement.
If you want people to RSVP right away, check Invitable. If you only want to list it for now, leave Invitable unchecked.
Workshop admin area
Once your workshop is created you can edit it any time. Each workshop has its own admin page where you manage the workshop and attendees.
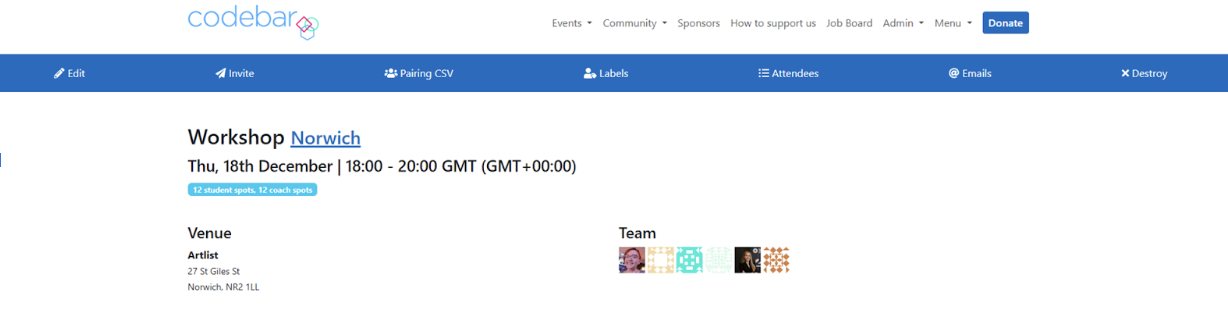
Buttons at the top
- Edit — edit workshop details
- Invite — invite chapter members (usually choose Everybody)
- Labels — download a CSV of attendees (useful if the host asks for a list)
- Attendees — see attendees and what students are working on
- Emails — view attendee emails (if you mass email, BCC everyone)
- Destroy — you can destroy a workshop up to 3 hours after creating it
Below the buttons you’ll see the venue, date, address, organisers, and student/coach spots.
Attendee list
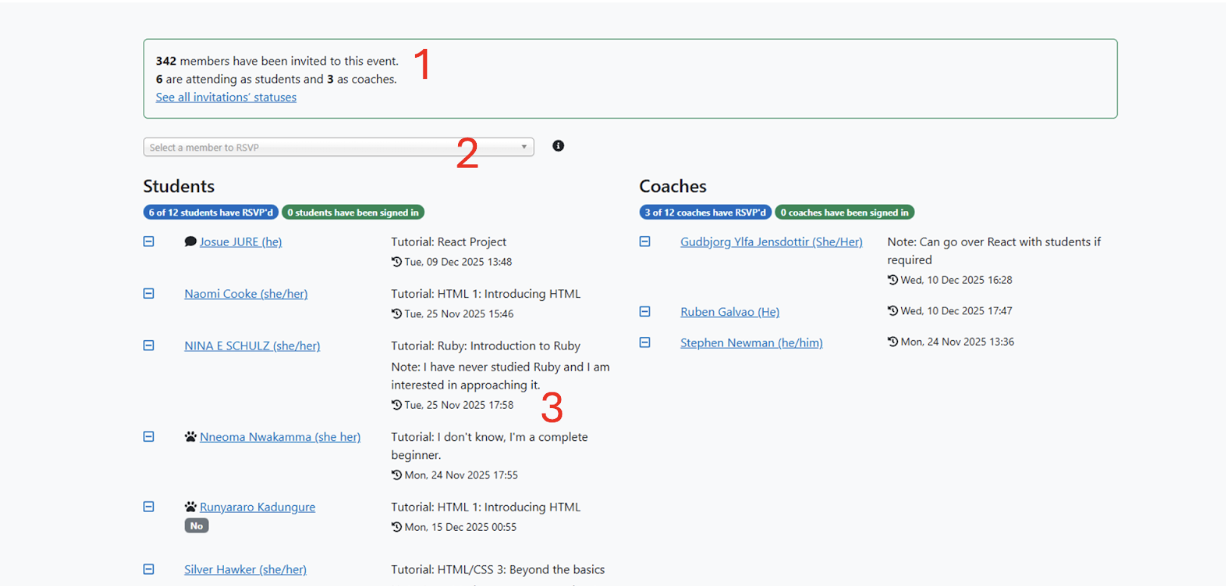
- Shows how many invitations were sent, RSVP counts, and waitlist counts (students/coaches).
- This drop down allows you to manually add someone (who has been email invited) from your chapter to the workshop if you need.
- On the left you have your list of students for the workshop and on the right you have your list of coaches.
- If you see a paw print next to someone’s name it means this is their first time attending a codebar workshop.
- If you see a “!” sign, it means someone has RSVP’d and not shown up more than 2 times.
- If someone has added dietary requirements you will see this under their name
- The minus symbol next to someone’s name means you can remove them from the workshops. Commonly used when someone emails beforehand saying they can no longer attend. This minus symbol changes at the start time of your workshop to a checkbox so you can check people in.
- Next to the students name you can see what they wish to work on during the workshop
- Each attendee is a hyperlink, which takes you to their member admin area.
Waitlist
Once spaces are filled up, a waitlist will appear. As people drop out, the next person is automatically sent an email and offered a space.
Member admin area
Every member of the codebar community has an admin area. You can view personal info, remove chapter subscriptions, see attendance history, send attendance/eligibility emails, leave notes, and ban members.
Actions
- Ban — ban someone (e.g. bad attendance or code of conduct issues). You can choose the ban duration.
- Note — add a note to someone’s profile (eligibility, behaviour, etc.).
- Eligibility — send an eligibility email if you’re unsure whether a student is eligible.
Note: a member who is only subscribed as a coach won’t have this button. - Attendance — send an attendance email if someone repeatedly RSVPs and doesn’t show up.
What you’ll see on the page
- Action buttons (Ban / Note / Eligibility / Attendance)
- Personal information
- Chapters the member subscribes to (remove a subscription using the X next to the chapter)
- RSVP vs attended counts (useful when deciding whether to send an attendance email)
- List of workshops/events they RSVP’d to:
- A tick indicates they attended
- A ! indicates they RSVP’d but didn’t show up
- Monthlies attended may be listed underneath too
Updating sponsor information
You can update sponsor information at any time. Specially useful if workshop numbers change, the company updates their logo or moves office. To do this :
- Go to https://codebar.io/admin/sponsors
- Find your sponsor and click Edit
- Make changes and click Save